AI can generate a polished product scene and still get the product wrong. A cap becomes taller. A label gains invented words. A floral detail moves. A bottle changes width between images. These are not minor aesthetic flaws when the image represents something a customer can buy.
Recent Reddit discussions show that AI product photo consistency remains a practical problem even for people who have tested several tools. One creator generating more than 100 ecommerce images reported product identity drift, unreliable reflections, and weak scale cues. A small business owner found that AI editors repeatedly moved or invented appliqués on a pair of custom socks. The useful lesson is not that AI product photography fails. It is that product truth needs a different workflow from creative scene generation.
Short answer: start with an approved real product image, define the details that must never change, and preserve those pixels whenever accuracy matters. Use AI to change the environment or a tightly selected region. Then compare every output against the real product before publishing it.
Table of Contents
- Why AI changes product details
- The seven product-accuracy problems and their fixes
- The product-truth workflow
- When to edit, regenerate, or reshoot
- How LinoCut supports a lower-risk workflow
- Ecommerce publishing and disclosure checks
- Frequently asked questions
Why Does AI Change Product Details?
An image generator does not understand your SKU as a fixed manufacturing specification. It interprets references, pixels, and instructions statistically. When asked to rebuild a complete scene, it may redraw both the background and the product—even if the prompt says to keep the product unchanged.
The risk increases when:
- the source image is blurry, compressed, cropped, or poorly lit;
- the product is small in the frame;
- only one angle is supplied for a pose that reveals unseen surfaces;
- logos, labels, stitching, or decorations are intricate;
- glass, chrome, foil, or translucent materials need physically correct reflections;
- the prompt asks for a major pose, camera-angle, or perspective change;
- several generations are chained together, allowing small errors to accumulate.
Researchers are actively working on this problem. A 2026 product-consistency study reported improvements in identity preservation and text rendering after specifically training image-editing models for those qualities. That progress is encouraging, but it also confirms that product consistency is a distinct technical problem—not something a longer prompt automatically solves.
7 AI Product Photo Consistency Problems—and How to Fix Them
The product shape or proportions change
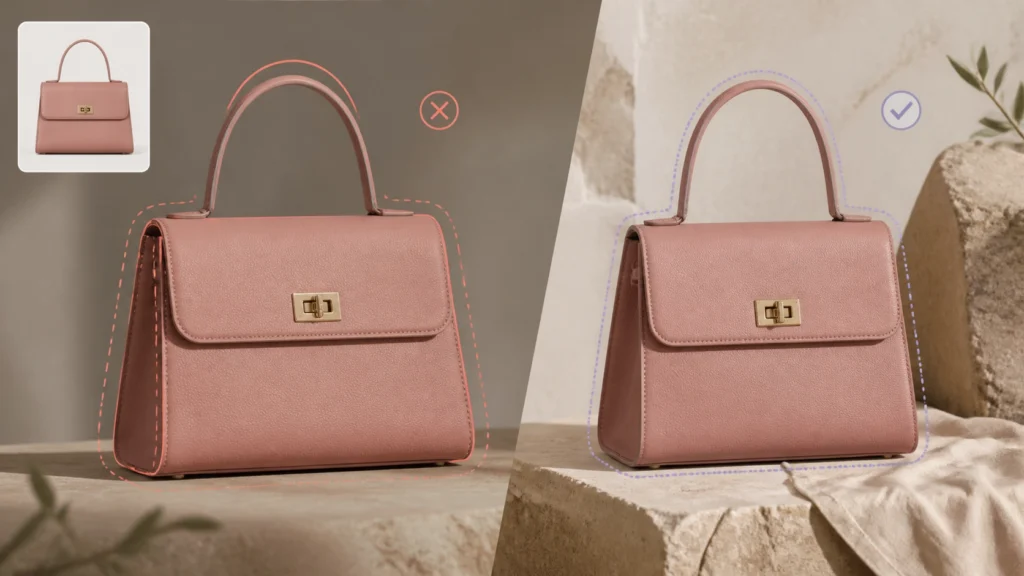
What it looks like: a bottle becomes wider, a handbag handle changes length, a shoe sole gains a curve, or a package contains different seams in each scene.
Why it happens: full-frame generation gives the model permission to reinterpret the silhouette. Large changes in camera angle also require the model to invent geometry it cannot see.
Fix: preserve the original product as a cutout and generate only the environment. If you need another angle, provide a real reference from that angle. Do not ask one frontal image to prove what the back or underside looks like.
Use this instruction block when an editor accepts an image reference:
Change only the background and surrounding props. Preserve the product silhouette, dimensions, cap, seams, edges, and all visible construction details exactly. Do not redraw or restyle the product.
If the outer contour is already wrong, reject the image. Local retouching is suitable for a small edge artifact, not for rebuilding the product's core geometry.
Logos, labels, and packaging text become distorted
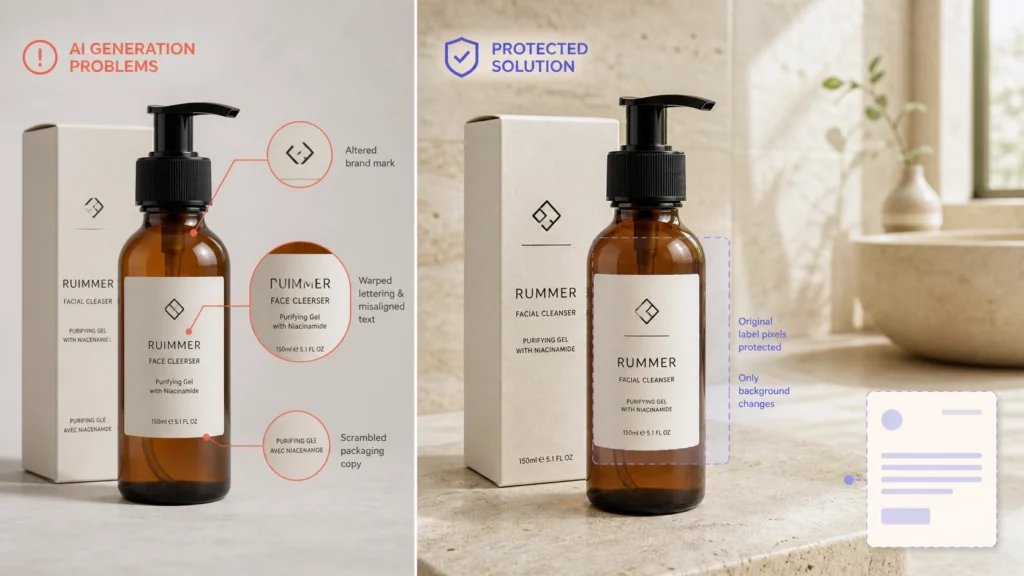
What it looks like: letters are misspelled, ingredient lines become invented symbols, a logo is simplified, or label spacing changes.
Why it happens: packaging text combines semantic meaning with exact typography and pixel placement. Even strong image models can treat it as visual texture during a scene transformation.
Fix: protect the approved label pixels. Mask the product out before changing the scene, or composite the original label back into the final image. Add campaign copy later in a layout tool rather than generating it inside the photograph.
Use a three-level rule:
- P0 — must be exact: brand mark, product name, dosage, quantity, certification, regulated claim.
- P1 — must remain visually faithful: decorative label pattern, typography hierarchy, color blocks, seals.
- P2 — may vary: background copy space, props, environmental texture, decorative lighting.
Any P0 error is an automatic rejection. Never publish a plausible-looking substitute for regulated or factual packaging text.
Colors drift between scenes
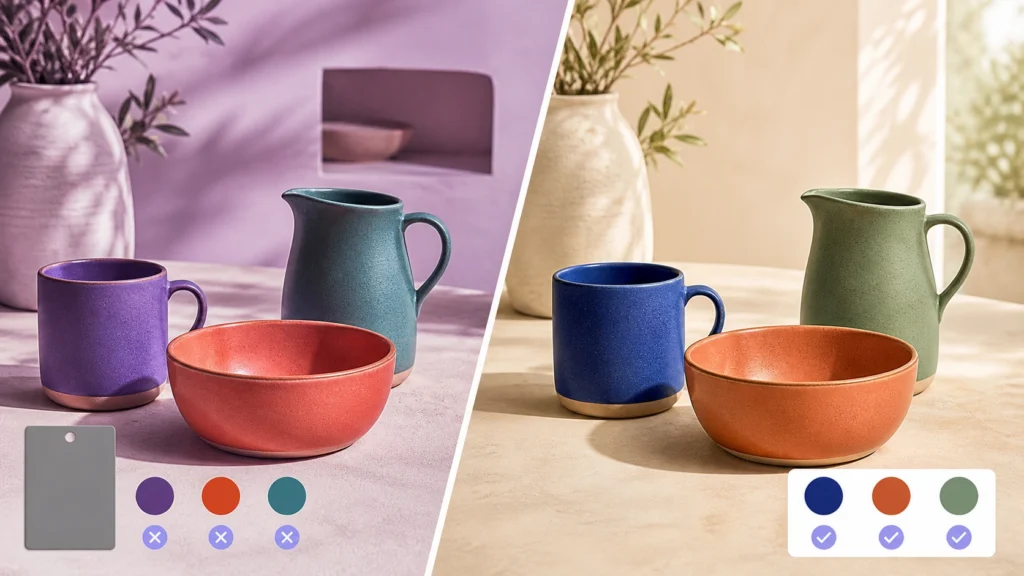
What it looks like: a coral product appears orange in one image and red in another, or two color variants become difficult to distinguish.
Why it happens: generated lighting changes perceived color. Automatic enhancement, white balance, and color grading can also shift the product itself.
Fix: create an approved color reference under neutral light and compare every output beside it. Apply scene color grading to the background first. Keep the product on a protected layer or mask, then make only a restrained exposure adjustment needed to integrate it.
For color-critical items:
- photograph a color chart or neutral gray card with the product;
- work in a consistent color space, usually sRGB for web delivery;
- compare the exported file on more than one display;
- do not use a generated lifestyle image as the sole evidence of color;
- keep a neutral catalog image available on the product page.
Small SKU-specific details move or multiply
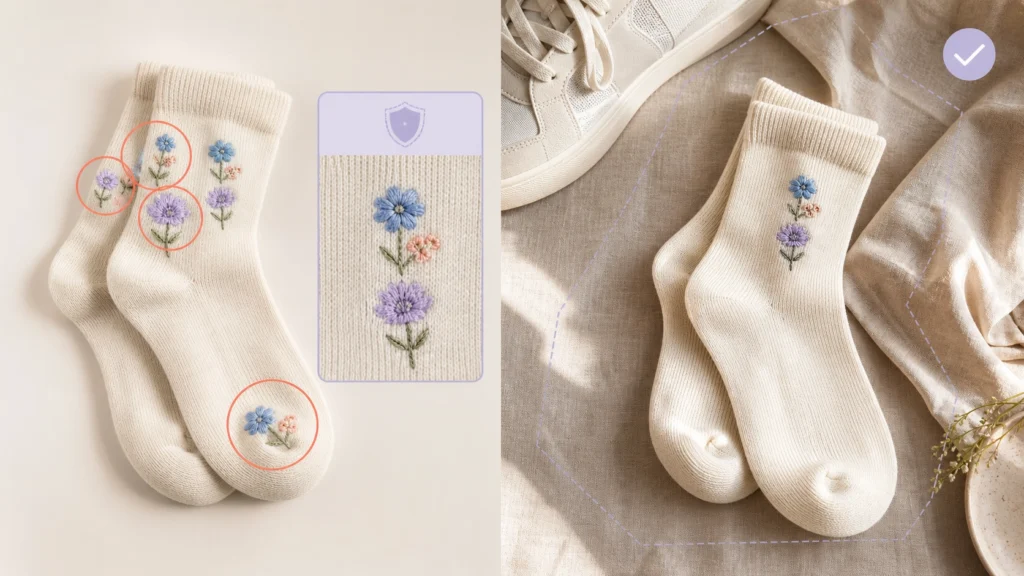
This failure is especially costly for jewelry, embroidery, footwear, fashion accessories, and handcrafted goods. In one Reddit example, AI tools repeatedly misplaced floral appliqués on custom socks or added decorations that did not exist.
Fix: treat unique details as protected product evidence, not as prompt concepts. Create a product-truth sheet containing close-up images and a written position map, such as:
- three floral appliqués only;
- largest flower centered 45 mm above the ankle seam;
- two smaller flowers positioned toward the outside of the leg;
- no decoration on the heel, toe, or inner side.
However, words alone are not enough for exact placement. Preserve the real product pixels when possible. If the product must appear on a model, use a controlled composite or a real on-model photograph for the final commercial asset. A fully generated try-on may be useful for concept testing, but it should not silently replace evidence of the real construction.
The product scale looks wrong or appears to float
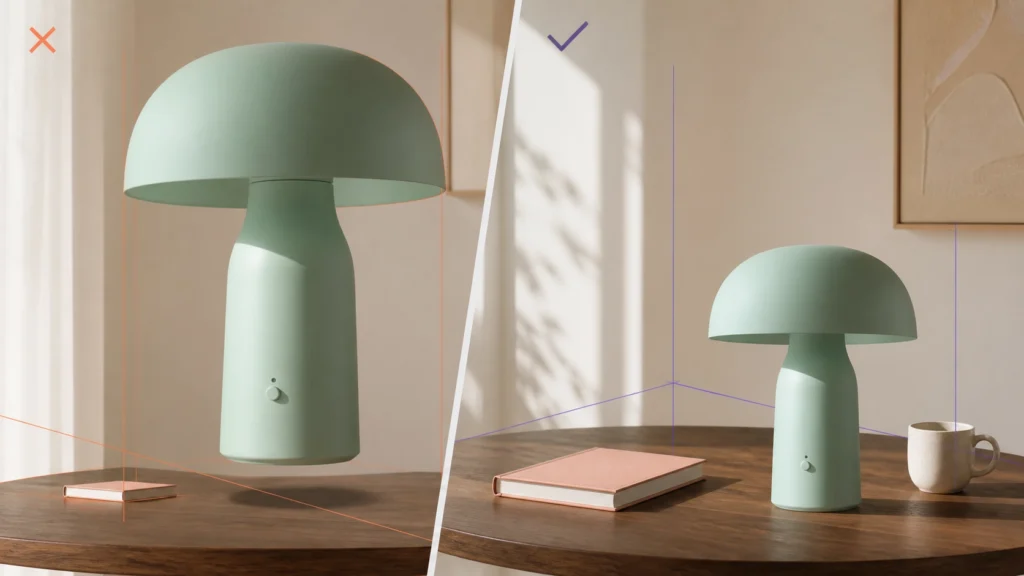
What it looks like: a mug seems oversized, a bottle has no believable weight, or a product sits above rather than on a surface.
Why it happens: an isolated object provides few physical cues. The model may create a scene without reconciling focal length, contact points, perspective, and real-world dimensions.
Fix: specify dimensions and add a legitimate scale cue. Then check the contact shadow and surface plane.
A useful prompt block is:
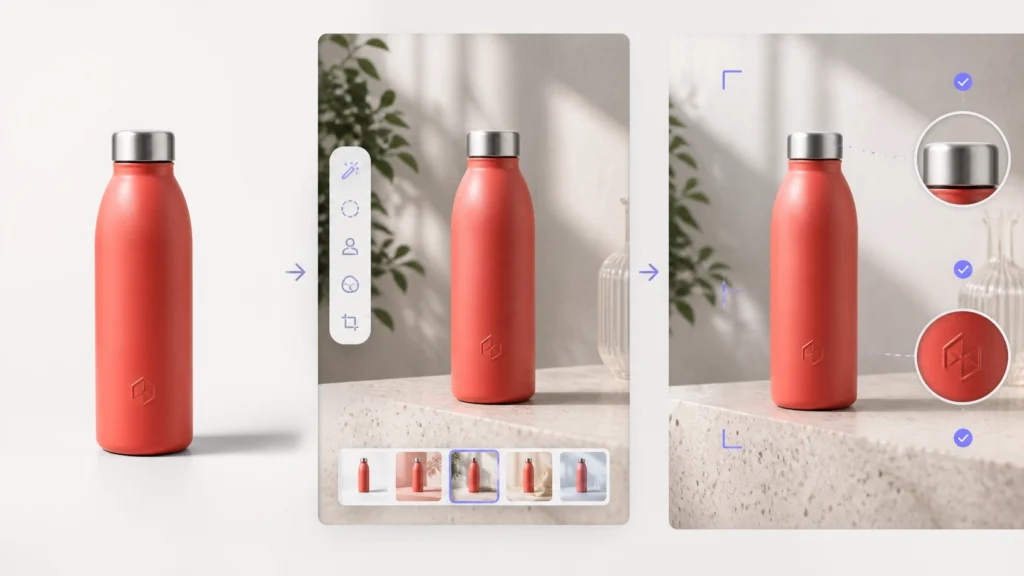
The bottle is 24 cm tall and 7 cm wide. Place it upright on the stone counter at realistic human scale. Match the counter perspective and create one soft contact shadow directly beneath the base. Do not stretch, shrink, tilt, or float the bottle.
Choose cues that belong in the scene. A coffee bean can help communicate the scale of a cup, while a bathroom counter or human hand can establish the size of skincare packaging. Do not add a prop to a marketplace main image when that prop could imply it is included with the purchase.
Reflective and transparent materials become physically impossible
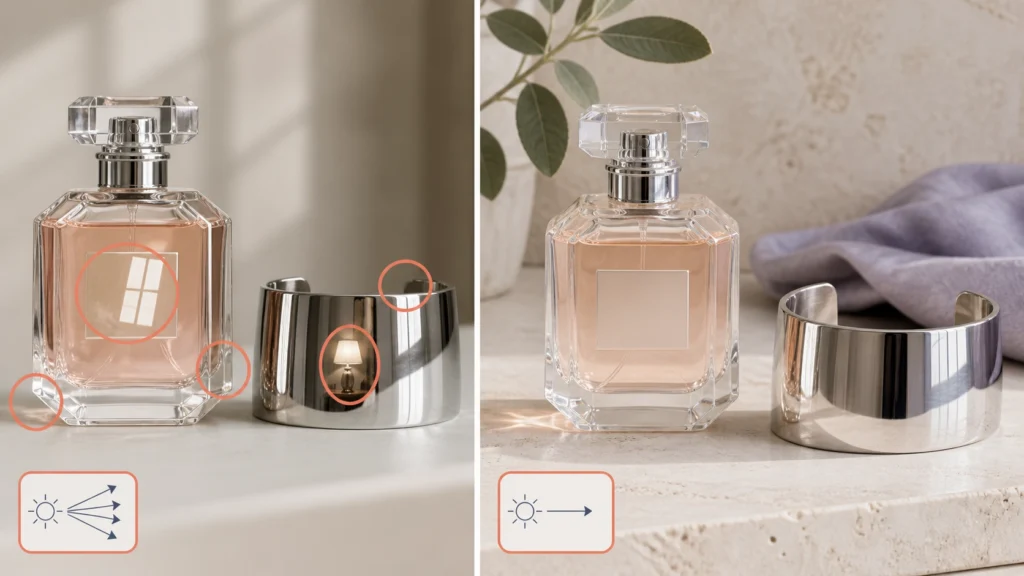
What it looks like: chrome reflects windows that are not present, glass edges disappear, a bottle contains impossible highlights, or metallic packaging looks like plastic.
Why it happens: reflections depend on the entire environment. When the product and background are generated separately, their lighting may contradict each other.
Fix: use real photography for the reflective product and let AI handle the environment. Preserve the original highlight structure unless the new scene requires a modest, manually controlled adjustment.
Run this material check:
- Does the main highlight agree with the scene's light direction?
- Do reflections bend with the product's real geometry?
- Is transparent material visible at its edges?
- Does the object cast or receive color contamination from nearby surfaces?
- Are there reflections of nonexistent windows, lamps, or people?
If several answers fail, reshoot or rebuild the composite. Repeated prompt changes often create different errors rather than repairing the underlying physical contradiction.
A product changes across a series or catalog
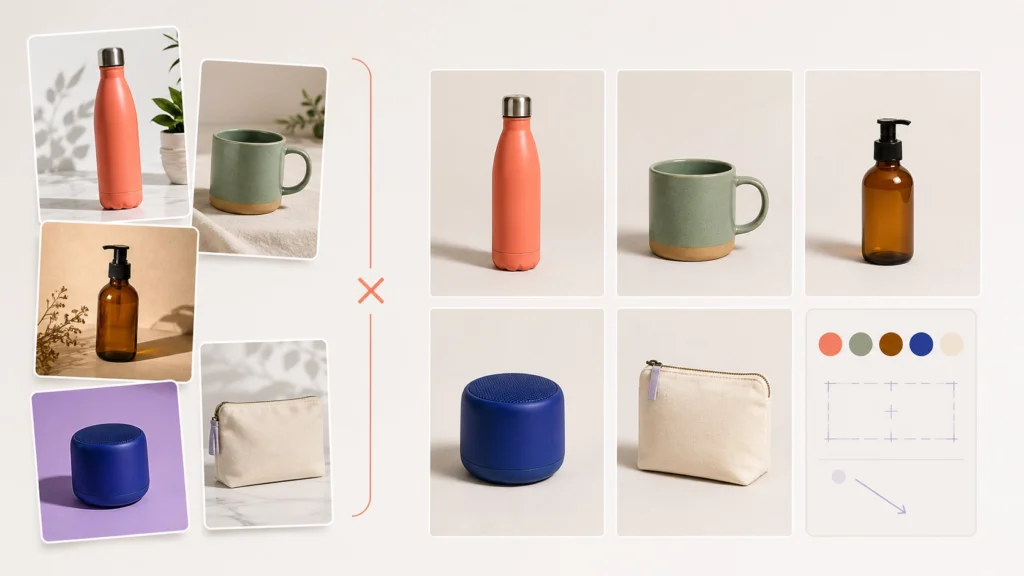
What it looks like: one image is individually attractive, but the gallery changes lighting, camera height, product size, background tone, or construction details from frame to frame.
Why it happens: every prompt is treated as a new creative request. Without a shared system, the model optimizes each image independently.
Fix: separate product identity from campaign style and lock both before production.
Create two reusable specifications:
- Product truth: approved references, dimensions, silhouette, materials, color, label, movable parts, included accessories, and forbidden changes.
- Visual system: camera height, lens feel, crop, light direction, shadow softness, background family, prop rules, and export ratios.
Generate a six-frame stress test before producing a full catalog:
- neutral front packshot;
- 45-degree studio view from a real reference;
- simple lifestyle scene;
- close-up detail;
- horizontal ad crop;
- vertical social crop.
If the product cannot survive these six frames, do not scale the workflow yet. Repair the reference set, reduce the permitted transformations, or switch to compositing.
A Product-Truth Workflow for Accurate AI Product Photos
The following process works better than attempting to solve every problem inside one prompt.
Step 1: Build an approved reference pack
Capture a neutral front image, side views, back view, important details, and the packaging. Use soft, even light and keep the entire object in focus. A modern phone can be sufficient if the image is sharp and free of heavy compression.
Name the files by purpose—such as front-master, label-detail, and side-left—so the team does not confuse an AI output with the source of truth.
Step 2: Write the product-truth sheet
Record what cannot change:
| Truth field | Example |
|---|---|
| Silhouette | Straight cylindrical body; lightly tapered shoulder |
| Dimensions | 24 × 7 cm |
| Material | Matte powder-coated steel |
| Color | Approved coral reference |
| Closure | Brushed silver screw cap with black gasket |
| Markings | One embossed geometric mark, lower front |
| Forbidden changes | No added text, handle, straw, pattern, or extra seam |
This sheet becomes both a prompt aid and a human QA checklist.
Step 3: Choose the smallest safe edit
Ask what actually needs to change. If the answer is “the background,” do not regenerate the bottle. If the answer is “remove dust,” select only the dust. Smaller edit regions reduce the opportunity for identity drift.
Step 4: Generate low-cost drafts first
Test composition, background, and lighting at draft quality before investing in enhancement. Reject scenes with the wrong camera angle, contact plane, or product scale early.
Step 5: Compare against the source, not your memory
Place the output beside the approved master at the same approximate size. Check silhouette, cap or closure, labels, seams, color, material, accessories, shadows, and reflections. Zoom in to 200% for packaging and edge inspection.
Step 6: Repair locally, regenerate structurally
Use local repair when one contained background area, dust spot, or edge artifact is wrong. Regenerate from better references when geometry, text, or several product facts disagree. Do not spend ten edits rescuing an image that failed product truth at the start.
Step 7: Approve and preserve a master
Save the approved, highest-quality version separately. Derive marketplace, website, email, and social crops from that master rather than sending each derivative through another generative pass.
Edit, Regenerate, or Reshoot? A Decision Table
| Situation | Best action | Reason |
|---|---|---|
| Background is wrong; product is correct | Edit background only | Preserves product evidence |
| Small edge or dust artifact | Local repair | Error is contained |
| Product silhouette or proportions are wrong | Regenerate from better references | Structural failure |
| Label or regulated copy is wrong | Restore original label or use layout software | Exact text is required |
| New angle exposes unseen surfaces | Photograph that angle or use verified 3D | The model lacks evidence |
| Chrome/glass reflections contradict the scene | Composite or reshoot | Physical lighting must agree |
| Concept ad does not claim exact SKU appearance | Generate, then disclose as appropriate | Creative variation is acceptable |
| Main marketplace image represents the sale item | Use verified photography/editing | Accuracy and platform rules dominate |
How LinoCut Supports a Lower-Risk Product Workflow
LinoCut brings common image tasks into one creative workspace, including background removal, photo enhancement, object removal, inpainting, and upscaling. For product work, the advantage is not an unsupported promise that AI will never alter a detail. It is the ability to build a more controlled sequence around a verified source image.
A practical LinoCut workflow is:
- Start with the approved real product photo.
- Use the Background Remover to isolate the product when the scene needs to change.
- Create or place the new background while keeping the product layer protected.
- Use object removal or inpainting only for tightly bounded corrections.
- Enhance or upscale after the product passes the truth check.
- Export one approved master and create channel-specific crops from it.
This approach keeps the reader's real objective first: produce more creative assets without presenting an invented SKU as the product for sale.
Related LinoCut resources can support different parts of the process:
- AI Photo Editor for controlled photo adjustments;
- Background Remover for preserving the product while changing the environment;
- Image Enhancer for final clarity after accuracy approval;
- Image Upscaler for larger exports after the master is verified;
- LinoCut workflow library for connecting repeatable production steps.
Ecommerce Publishing and Disclosure Checks
Accuracy review is only one part of delivery. Before an AI-assisted product image goes live, verify the requirements of the destination channel.
For example, Google's Merchant Center guidance states that generative-AI-created product images should retain metadata identifying them as AI-generated. Google Search also recommends providing useful context about how automated content was created when that context helps users. See the official Merchant Center guidance for AI-generated content and Google Search guidance on generative AI content.
Use this pre-publish checklist:
- The pictured SKU matches the item the customer will receive.
- Quantity, size, included accessories, color, and variants are not misleading.
- Labels, claims, and certifications match the approved packaging.
- Generated props do not imply they are included.
- Marketplace background, crop, resolution, and image-order rules are met.
- AI-related metadata or disclosure is retained where the platform requires it.
- A human has approved color-critical, regulated, medical, cosmetic, food, or safety-related details.
- The original source, prompt/version, edit history, and approved master are archived.
Final Takeaway
Better prompting can reduce errors, but it cannot turn an unknown product surface into verified evidence. Reliable AI product photo consistency comes from controlling what the model is allowed to change.
Protect the real product, generate the environment, compare every result against a truth sheet, and repair only the smallest necessary region. When the requested view exceeds the available evidence—or when exact physical truth is legally or commercially important—photograph, composite, or build a verified 3D asset instead.
That hybrid mindset gives ecommerce teams the useful part of AI—speed, variation, and creative range—without sacrificing the facts customers depend on.
Frequently Asked Questions
How do I stop AI from changing my product?
Use an approved product image as a protected layer or masked reference and edit only the background or selected region. Define immutable details such as silhouette, dimensions, label, color, closures, and decorations. Compare every output against the approved image before publishing it.
Can AI guarantee accurate logos and labels?
No. A precise prompt may reduce errors, but exact logos, packaging text, dosage information, and regulated claims should be preserved from approved artwork or restored in a layout tool. Any incorrect factual label should trigger rejection.
Is AI suitable for product photos with glass or chrome?
AI is useful for scene concepts and controlled background work, but reflective products need careful human review. Preserve real highlight and reflection structure when possible. Reshoot or composite if generated reflections contradict the environment or distort the material.
How can I keep a product consistent across many images?
Use the same approved reference pack, product-truth sheet, camera rules, lighting system, background family, and QA checklist for every image. Test six representative frames before scaling production, and derive crops from one approved master instead of regenerating each format.
Should I edit a real product photo or generate a new one?
Edit a real photo when the exact SKU, label, color, construction, or included accessories must remain accurate. Generate a full image for early concepts or campaigns where controlled variation is acceptable and clearly reviewed. Use photography or verified 3D when unseen geometry must be exact.